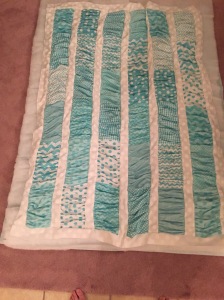
Fabric: Riley Blake Basic Variety Aqua (for quilt top and binding), the backing was blue/white dots called Animal Farm (weird.) that I got at one of my local quilt shops (Minding My Ps and Qs).
Pattern Ruffle On! from Craftsy
Batting: Mountain Mist 100% Polyester, High Loft (VERY fluffy!)
Machine: Brother CS6000i
I decided to first blog about this because it was the first quilt I finished. I learned a LOT on this one…although it was a bit out of the ordinary for a quilt. I saw this a few months ago on Craftsy and immediately wanted to make it. However, I didn’t really have a reason to make it. Then I found out one of our friend’s was pregnant and had the perfect reason! Our friends Edwin and Celia Hoffman are due to have their little baby boy, Hemi, early this year! I didn’t tell them I was making it because I like surprises and, honestly, I didn’t know how all this was going to turn out. I kind of thought I may not be able to complete it!
I ordered the aqua kit and started the quilt almost as soon as I got the kit. I started out as I always do by cutting up all the fabric into the required pieces. Then I started making the ruffles. The pattern called for making the ruffles a certain way, but after reading what some other Craftsy quilters did, I used a different method which worked out much better for me. I can’t even describe how the pattern said to do the ruffles, but another quilter suggested that I do a long, loose stitch and then pull the bobbin thread to ruffle. So…I did just that! I took a while, but worked out great!
Next, I began constructing the quilt top. Each of the ruffles should measure 10″ and the rows should match up. That was quite challenging to manage but I actually got most of them lined up pretty well. There were a couple of mistakes, but it was okay in the end.
I had to put my quilt together and baste it next. I chose the high loft polyester batting because of my experience with the quilts I was given for Vivi. One had a very traditional quilt batting and the other had a bit of puff to it. I thought the more traditional one was prettier, but when she was small, I preferred the puffier one because there was more padding when she toppled over as she was learning to sit up on her own. So, I chose a fluffy batting for that reason. I wanted baby to have something soft and fluffy to lay and sit on while playing.
Here it is after basting and trimming:
Then the quilting began! I started by stitching straight down the middle two rows to stabilize the middle and then I worked out from there stitching long rows along the white sashing. Here’s some pics of me proving I could quilt this monster on my bitty machine 🙂 (side note: A few days earlier a guy at a sewing machine shop told me my machine was not made to quilt and it would likely not work for any type of quilting. Even though there is an entire section on quilting in the manual! Well, here’s proof! It works beautifully.)
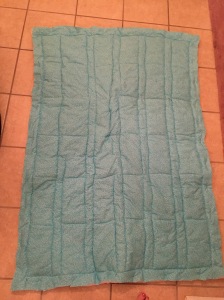
I sewed all my rows without flipping it over to see how the back was looking. That turned out to be a mistake. On the finished product (below) you’ll see where the back got a couple puckers and uneven spots when I quilted the first few rows. Again, this is my first attempt at any type of quilting so it was inevitable that I make a mistake or two. After I quilted the rows long ways, I rotated the quilt and quilted the breaks between the patterns. Working with a quilt with such thick batting was really hard. It was next to impossible to keep my rows straight, but I did the best I could.
Here’s a pic of the back before I did the binding where you can see the puckers. Dang it! I also noticed after I took this picture that I missed a row at the top left. I did go back and fix that.
If I make this quilt again, I probably won’t use this batting. Even though I like the cuddliness of it, I think it would have turned out better using a different batting.
After I finished that, I gave it one last trimming around the edges and then sewed the binding on. The binding was extremely challenging with the fluffy batting as well.
Then my quilt was done! And it was cuddly just like I had hoped!
Here’s a close up of the backing fabric.
Here’s the happy poppa when they got the quilt in the mail!
I thoroughly enjoyed making this quilt. I learned so much and I was happy to gift it to a couple that we dearly love and care about.
We can’t wait to meet the new little baby boy!! I love new little baby squish!


